Wednesday, June 19, 2013

Wood Burning


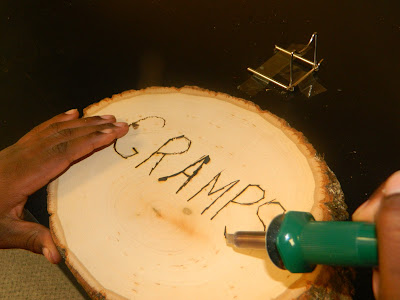
Wood burning is a wonderful craft hobby. I remember when I was a child and would use the heat from the sun and carve words into wood. The other day I had the opportunity to share this beloved past time with my son, although it was raining outside we were still able to do this craft using a wood burning tool. You can find this tool at most crafts stores, I saw one the other day at Jo Ann Fabrics. The wood burning tool that is available in the Studio was purchased at Imagine Childhood.

                                                                           
I have this activity set up on the shelf in the Wood Working area. I set it up so that the child would choose a piece of wood and then ask me for assistance. As I assist and observe and the child performs the work diligently and safely they can begin to work with this activity on their own. In the event that the child has had previous wood burning experience we would review the safety precautions necessary to complete this work independently and they would demonstrate their knowledge for me using a "test" piece of wood. When my son, DJ worked with this activity we did it together, but after a few days he was independently working. DJ is nine years old, I also made sure that younger children were not in the same area as he was while working with the wood burning tool.

This is a picture of the test wood. I have it as part of the activity so children can become confident while beginning to learn wood burning, and to practice on before beginning their "real" work.
                               

After a couple days DJ was making gifts for Father's Day.

As each child begins to be a master of their work they will learn to make carbon copies of drawings to use to trace onto wood using the wood burning tool. The examples above came with our wood burning tool. 

This is also a great practical life activity as well as language activity. It wasn't too long after DJ was wood  burning names in wood that he followed up practicing his cursive handwriting. He has plans to make more wood burning gifts and thinks cursive writing would look really cool.

Thursday, June 13, 2013

Clay as an Independent Activity

There is no doubt about it Clay is a favorite art medium among children and to many adults too. The benefits of using clay are huge! For young children working with clay their fingers and hands get an awesome work out. As the child develops they use clay as a medium to create, destroy and recreate over and over. Finally when the child has worked with clay often they create masterpieces, first as flat art work that they love to paint, as mastery of working with clay in such a way that the hands are massaging the material they began to make three dimensional structures. Those who truly enjoy this art material go on to learn the art of pottery.

 When I was exploring a way to make clay an accessible activity to the children here at the Studio I thought about what things I have observed children make while using clay. I observed plates, rocks, mask, and vases. I was amazed one time when I saw a child make a person. She free handed everything! The concentration was amazing and the focus attention couldn't be broken, even when she heard that it was time to play outdoors. This child's work is the inspiration behind this Clay activity.


 The tray contains all of the necessary materials for the child to complete this work
  1. The clay is in the jar.
  2. A cup to fill with water and pour in the butterfly designed dish to moisten the clay if need be.
  3. Molds can be used to design a person/fairy, etc.
  4. Wire to help join the clay body parts together.
  5. Pliers to cut the wire with ease.

At the Studio we use Das as our go to for clay when producing our masterpieces. For pure clay fun we use Crayola Air Dry Clay. Our hands and our work deserve the very best!                                                             

When is the last time you and your child(ren) played with clay? It is so relaxing!

Linking up to Friday's Nature Table.
                                                                 

Tuesday, June 11, 2013

The Microscope: Investigate and Explore

When introducing activities to children it is important that the child has a concrete understanding of what is being introduced. I love scaffolding it allows the child to dig deeper at their own pace, and it allows for self exploration which leads to meaningful work. There are many concepts that can be explored or introduced at various levels, one being the microscope.

When I first introduced the microscope to my children I stated what the purpose of the microscope was and why I like to use it. After they were hooked by the fascination of seeing something so small  magnified, I went on to introduce the parts of the microscope. This step by step method allowed them to build confidence with this science tool and take ownership of  their own knowledge. After observing them closely and seeing that they were properly using and caring for it we went on to making microscope slides. The next step is learning the proper names of the tools used to make the slides and the solutions involved. Again I observed and when these skills were mastered they were able to make microscope slides without assistance or waiting on my permission. All three of the children were so called to this work that we eventually ran out of slides as often as we ran out of bread. They were looking at dog hairs, mud, each other's germs, etc.  Fun Stuff!


In the Studio we have the "Make Your Own Microscope Slide" work available. For the child who has yet to be introduced to the microscope this is a nice introductory lesson that will need some assistance and perhaps just using the microscope to view the prepared slides may be enough. I am positive that which ever direction you take it would lead to nice follow up work at home/school or by spending more time at the Studio. For others who are familiar with the microscope I see new discoveries being made, extensions created to this work leading to great child led projects.

A Little Tour

We celebrated the grand opening of the Studio this past Saturday! It was so much fun meeting new people, I especially loved seeing the smiles on the children's faces as they familiarized themselves with the activities offered.  

Today I would like to share a tour of the Studio in hopes to inspire you to come on in!


As you enter ahead you will see the coat rack, and to the left of you is our area where I have dedicated to Cultural materials.
A closer view of some of the shelves that house the art materials.

                         
                                                The Science area.

                                                     Our Nature Corner.

                                                                   
The Monarch and Lady Painted Caterpillars have been getting a lot of attention in this area.


The Lego Room which also houses Montessori Sensorial and Math Materials. The Project Based Studio is greatly influenced by the Montessori Method! 
                       
The Laptop and I Pads' are also available for use and I encourage the children to use them for researching, photography, video editing and music making.


                                                   The Music Room.

Around the corner is the language related activities as well as leading into our Practical Life shelves.

                                                                     
                               Story telling and Puppet Theater.
                                                                          
                                                      Photography.

                                                                         
                                                   Cosmetology/ Face painting.

There are a lot more Language materials that I didn't take a picture of. As you leave the area you will enter the Sewing and Woodworking area.


We also have a snack area available that will also have more practical life activities available, like baking with the convection oven, and a place for the children to keep the supplies clean after use.


Oh I can't forget to share our ever growing library! We are slowly adding books in so that we can keep this area as organized as possible. The printer and laminator are also available for a small fee.


I hope you enjoyed the tour!

I am linking this post to Montessori Monday hosted by Living Montessori Now.